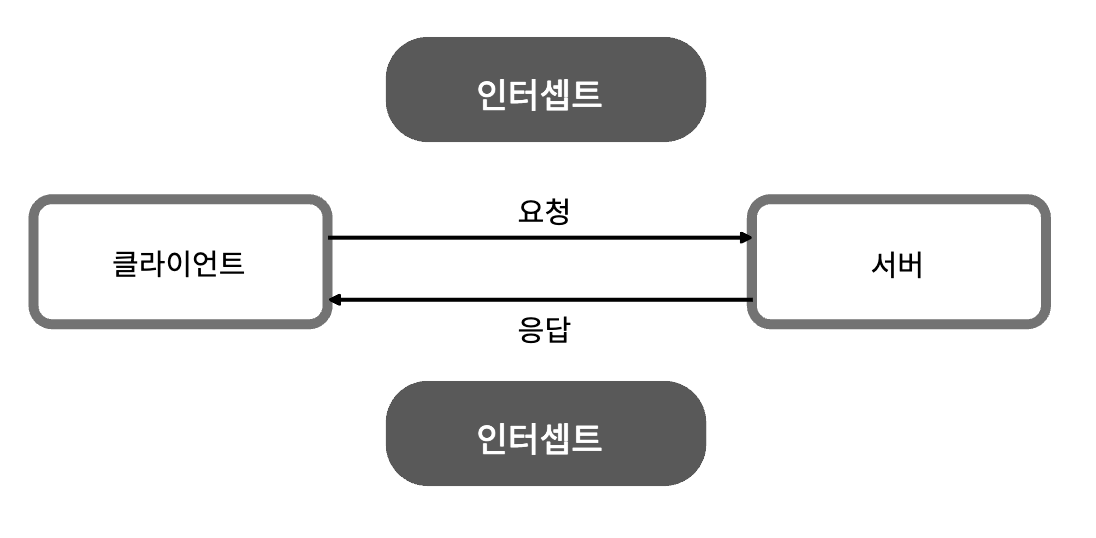
인터셉터
- 요청과 응답을 가로채서 변형을 가할 수 있는 컴포넌트
- 인터 셉터는 주로 다음과 같은 기능을 수행한다.
1. 요청에 대한 검증 : 요청이 유효한지 확인, 필요한 경우 에러 응답을 반환
2. 로깅 : 요청과 응답에 대한 로그를 작성
3. 권한 인가 : 요청이 인증된 사용자에 의해 수행되었는지 확인
4. 캐싱 : 응답을 캐시하여 빠른 처리를 가능하게 한다.
5. 추가 데이터 전달 : 요청과 응답에 추가적인 데이터를 전달
6. 응답 조작: 서비스에서 반환하는 데이터를 조작하거나, 응답 헤더 등을 수정.
- 인터셉터는 미들웨어와 수행하는 일이 비슷하지만, 수행 시점에 차이가 존재한다.
미들웨어는 요청이 라우터 핸들러로 전달되기 전에 동작, 인터셉터는 요청에 대한 라우터 핸들러의 처리 전/후 호출되어 요청과 응답을 다룰 수 있다.
또한 미들웨어는 여러 개의 미들 웨어를 조합하여 각기 다른 목적을 가진 미들웨어 로직을 수행할 수 있다.
- 인터셉터는 '@nestjs/common' 모듈에서 제공되며, '@Injectable()' 데코레이터로 클래스를 정의하고 'NestInterceptor' 인터페이스를 구현하여 생성된다.
import {
  CallHandler,
  ExecutionContext,
  Injectable,
  Logger,
  NestInterceptor,
} from '@nestjs/common';
import { Observable } from 'rxjs';
import { tap } from 'rxjs/operators';

@Injectable()
export class LoggingInterceptor implements NestInterceptor {
  private readonly logger = new Logger(LoggingInterceptor.name);
  ...
- 언터셉터를 적용하려는 컨트롤러 혹은 라우터에 '@UseInterceptors()' 데코레이터를 추가하여 등록한다.
import { Controller, Get, UseInterceptors } from '@nestjs/common';
import { LoggingInterceptor } from './interceptors/logging.interceptor';

@Controller('users')
@UseInterceptors(LoggingInterceptor)
export class UserController {
  // ...
}
- 전역으로 등록하기 위해서는 다음과 같이 하면 된다.
import { NestFactory } from '@nestjs/core';
import { AppModule } from './app.module';
import { LoggingInterceptor } from './logging.interceptor';

async function bootstrap() {
  const app = await NestFactory.create(AppModule);
  app.useGlobalInterceptors(new LoggingInterceptor());
  await app.listen(3000);
}
bootstrap();
- 다음 코드는 해당 컨트롤러에 대한 들어오는 요청과 응답을 로그로 남기는 인터셉트이다.
import {
  CallHandler,
  ExecutionContext,
  Injectable,
  Logger,
  NestInterceptor,
} from '@nestjs/common';
import { Observable } from 'rxjs';
import { tap } from 'rxjs/operators';

@Injectable()
export class LoggingInterceptor implements NestInterceptor {
  constructor(private logger: Logger) {}

  intercept(
    context: ExecutionContext,
    next: CallHandler<any>,
  ): Observable<any> {
    //실행 콘텍스트에 포함된 첫 번재 객체를 얻어 옵니다. 이 객체로부터 요청 정보를 얻을 수 있습니다.
    const { method, url, body } = context.getArgByIndex(0);
    // 요청의 HTTP 메서드와 URL을 로그로 출력합니다.
    this.logger.log(`Request to ${method} ${url}`);

    return next
      .handle()
      .pipe(
        tap((data) =>
          this.logger.log(
            `Response from ${method} ${url} \n response: ${JSON.stringify(
              data,
            )}`,
          ),
        ),
      );
  }
}
- 위 인터셉터를 바로 AppModule에 적용하지 않고 LoggingModule로 분리하여 적용하는 코드이다.
import { Logger, Module } from '@nestjs/common';
import { APP_INTERCEPTOR } from '@nestjs/core';
import { LoggingInterceptor } from './loggin.interceptor';

@Module({
  providers: [
    Logger,
    { provide: APP_INTERCEPTOR, useClass: LoggingInterceptor },
  ],
})
export class LoggingModule {}
- 인터셉터의 실행 순서는 가드와 유사하다.
- 다만 요청은 전역->컨트롤러->라우터 순서지만, 응답은 라우터-> 컨트롤러->전역으로 동작한다.
'Back-End > Nest.js' 카테고리의 다른 글
| 예외 처리 (0) | 2023.02.13 |
|---|---|
| 내장 로거 (0) | 2023.02.13 |
| 파이프와 유효성 검사 (0) | 2023.02.01 |
| 동적 모듈을 활용한 환경 변수 구성 (0) | 2023.01.25 |
| 멋사 2주차 JS decorator, MVC 패턴, Nest.js 찍먹 (0) | 2023.01.11 |

